ubuntu版本:24.04.3
Kubernetes版本:v1.28.2
网络插件CNI(Container Network Interface) :calico v3.27.2
容器运行时:Docker 28.2.2
高可用部署方案:keepalived、haproxy
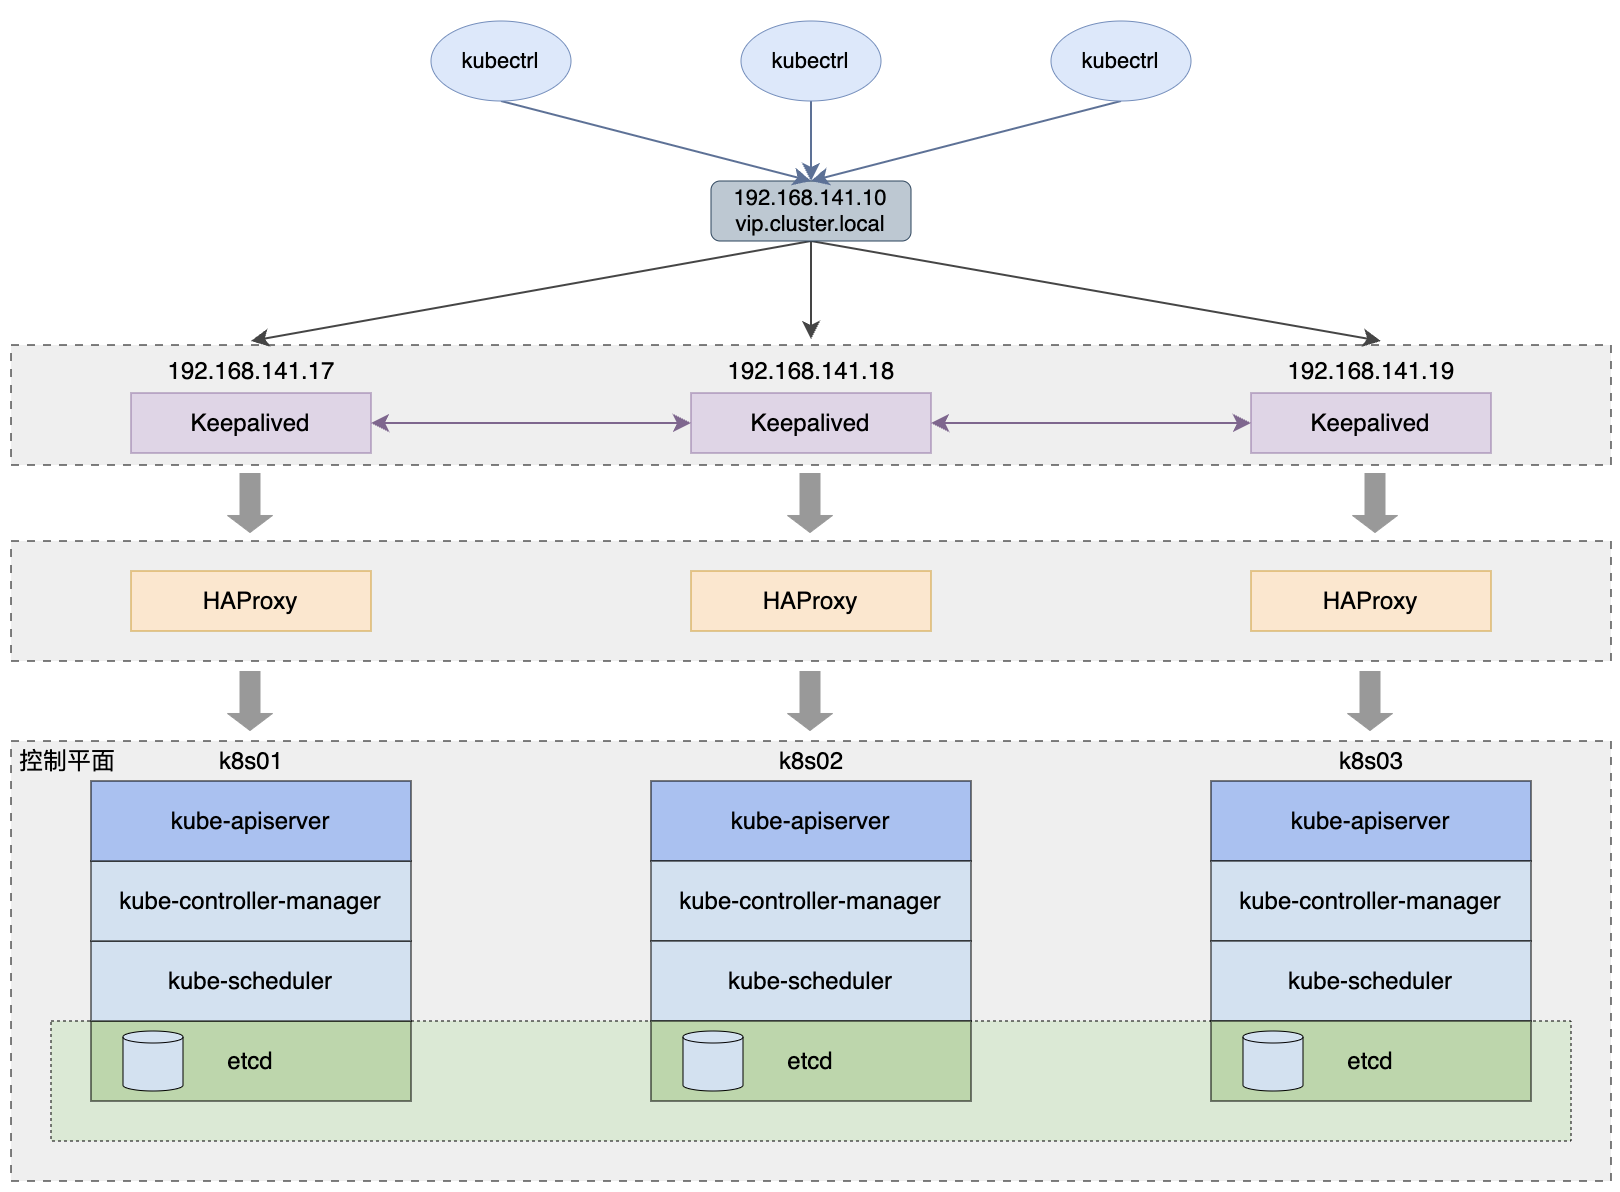
目标部署一个HA Kubernetes集群,使用堆叠(stacked)控制平面节点,etcd节点与控制平面节点共存,示意图如下:
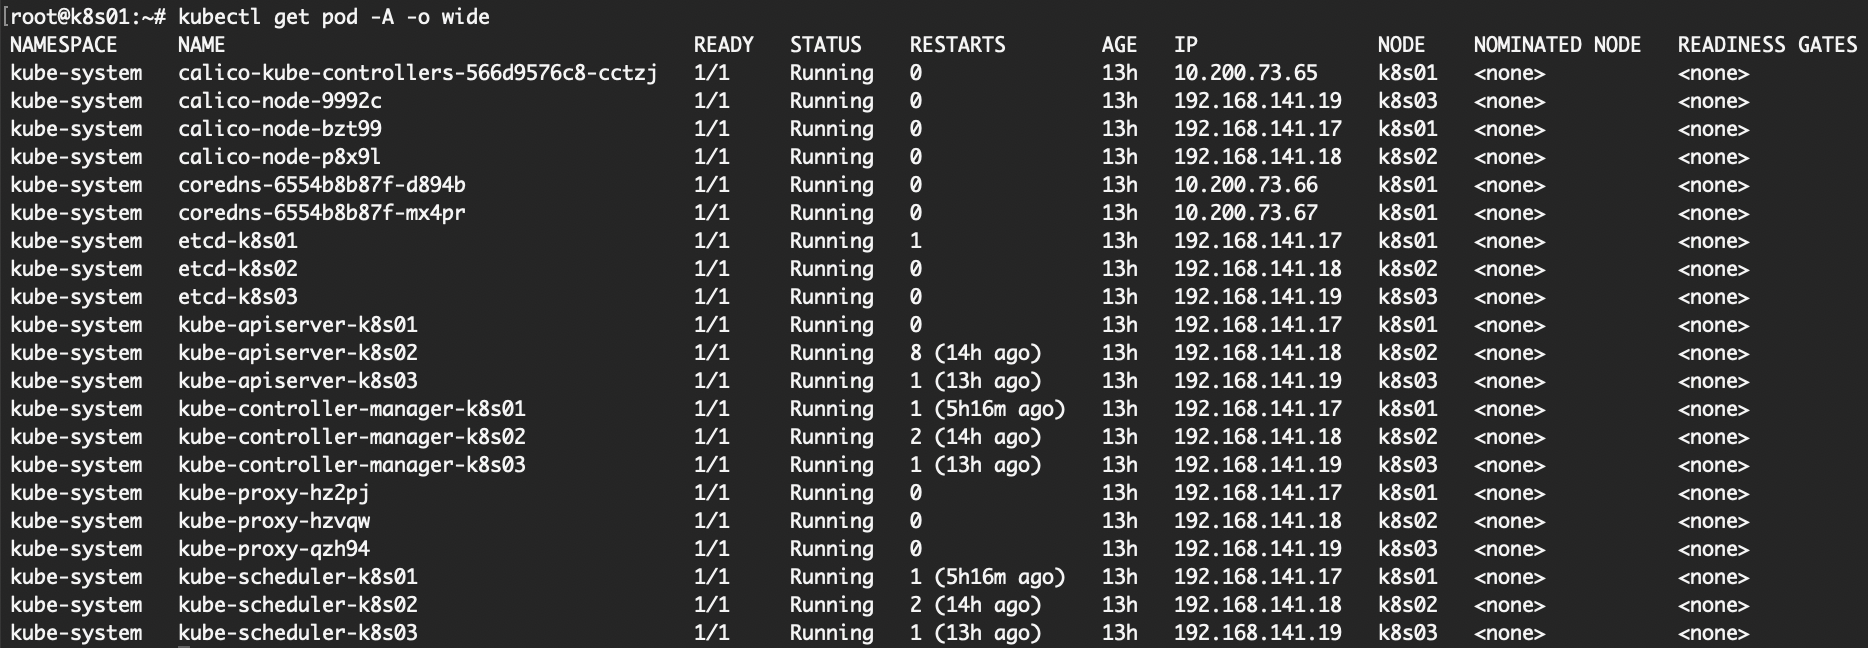
部署完成的节点状态:
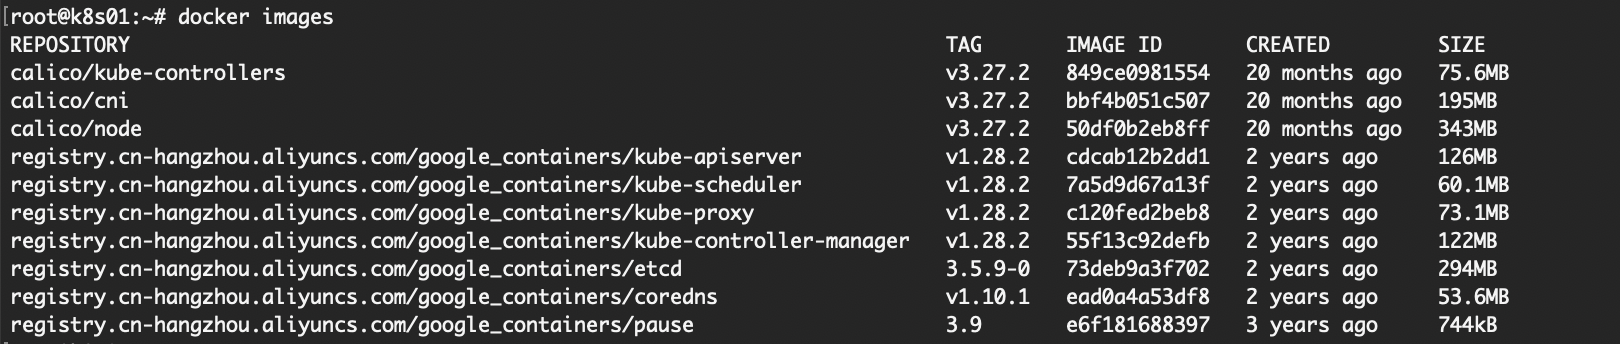
部署完成的基本组件:
环境准备 默认已准备好三台虚拟机,网络正常,Docker环境已安装
Linux基础配置
1
2
3
4
5
6
7
8
9
10
11
12
13
14
15
16
17
18
19
20
21
22
23
24
25
26
27
28
29
30
31
32
33
34
35
# sudo apt -y install chrony sudo systemctl enable chrony && sudo systemctl start chrony # # # sudo timedatectl set-timezone Asia/Shanghai # sudo hostnamectl set-hostname k8s01 # cat << EOF | sudo tee /etc/hosts 192.168.141.10 vip.cluster.local 192.168.141.17 k8s01 192.168.141.18 k8s02 192.168.141.19 k8s03 EOF # ssh-keygen ssh-copy-id 192.168.141.17 ssh-copy-id 192.168.141.18 ssh-copy-id 192.168.141.19 # sudo swapoff -a && sudo sed -i '/swap/s/^/#/' /etc/fstab # sudo ufw disable # #
内核参数调整
1
2
3
4
5
6
7
8
9
10
11
12
13
14
15
16
17
18
19
20
21
22
23
24
25
26
# sudo modprobe overlay sudo modprobe br_netfilter # cat <<EOF | sudo tee /etc/modules-load.d/k8s.conf overlay br_netfilter EOF # # # # cat <<EOF | sudo tee /etc/sysctl.d/k8s.conf net.bridge.bridge-nf-call-iptables = 1 net.bridge.bridge-nf-call-ip6tables = 1 net.ipv4.ip_forward = 1 EOF # sudo sysctl --system # #
配置ipvs
1
2
3
4
5
6
7
8
9
10
11
12
13
14
15
16
17
18
# sudo apt install -y ipset ipvsadm # sudo modprobe ip_vs sudo modprobe ip_vs_rr sudo modprobe ip_vs_wrr sudo modprobe ip_vs_sh sudo modprobe nf_conntrack # 设置开机加载 cat <<EOF | sudo tee /etc/modules-load.d/ipvs.conf ip_vs ip_vs_rr ip_vs_wrr ip_vs_sh nf_conntrack EOF
安装kubeadm、kubelet、kubectl 安装cri-docker
Kubernetes1.20开始宣布要弃用dockershim,并在Kubernetes1.24正式移除,推荐直接使用containerd容器运行时,但是对于有历史使用习惯的人来说还是倾向选择docker,虽然它也只是在containerd上面加了一层而已。
这里选择的是最新版本:cri-dockerd_0.4.0.3-0.debian-bookworm_amd64.deb,下载地址:https://github.com/Mirantis/cri-dockerd/releases
修改下ExecStart,指定下网络插件和pause镜像
/lib/systemd/system/cri-docker.service 1 ExecStart=/usr/bin/cri-dockerd --network-plugin=cni --pod-infra-container-image=registry.cn-hangzhou.aliyuncs.com/google_containers/pause:3.9 --container-runtime-endpoint fd://
添加下面设置,让crictl能连接到Docker容器
1
2
3
4
5
6
sudo tee /etc/crictl.yaml << EOF runtime-endpoint: unix:///var/run/cri-dockerd.sock image-endpoint: unix:///var/run/cri-dockerd.sock timeout: 10 debug: false EOF
1
2
3
4
systemctl daemon-reload && systemctl restart cri-docker.service # sudo crictl info
安装kubelet
1
2
3
4
5
6
7
8
9
10
11
12
13
14
15
16
17
18
19
20
21
22
23
24
25
# sudo apt-get update && sudo apt-get install -y apt-transport-https ca-certificates curl gpg # curl -fsSL https://mirrors.aliyun.com/kubernetes/apt/doc/apt-key.gpg | sudo gpg --dearmor -o /etc/apt/keyrings/kubernetes-apt-keyring.gpg # echo 'deb [signed-by=/etc/apt/keyrings/kubernetes-apt-keyring.gpg] https://mirrors.aliyun.com/kubernetes/apt/ kubernetes-xenial main' | sudo tee /etc/apt/sources.list.d/kubernetes.list # sudo apt update # # # sudo apt-get install -y kubelet kubeadm kubectl # sudo apt-mark hold kubelet kubeadm kubectl # sudo apt install -y bash-completion kubectl completion bash | sudo tee /etc/profile.d/kubectl_completion.sh > /dev/null . /etc/profile.d/kubectl_completion.sh
部署keepalived、haproxy 1 2 3 4 5 sudo apt install keepalived haproxy # systemctl is-enabled keepalived systemctl is-enabled haproxy.service
配置haproxy
主要是追加frontend apiserver和backend apiserverbackend内容
/etc/haproxy/haproxy.cfg 1 2 3 4 5 6 7 8 9 10 11 12 13 14 15 16 17 18 19 20 21 22 23 24 25 #--------------------------------------------------------------------- # apiserver frontend which proxys to the control plane nodes #--------------------------------------------------------------------- frontend apiserver bind *:16443 mode tcp option tcplog default_backend apiserverbackend #--------------------------------------------------------------------- # round robin balancing for apiserver #--------------------------------------------------------------------- backend apiserverbackend option httpchk http-check connect ssl http-check send meth GET uri /healthz http-check expect status 200 mode tcp balance roundrobin server k8s01 192.168.141.17:6443 check verify none server k8s02 192.168.141.18:6443 check verify none server k8s03 192.168.141.19:6443 check verify none
重启haproxy服务,haproxy会监听16443端口
1 sudo systemctl restart haproxy
配置keepalived
这里只需要用到它的虚拟ip功能,所以配置比较简单,指定一个脚本来检查apiserver状态即可
/etc/keepalived/keepalived.conf 1 2 3 4 5 6 7 8 9 10 11 12 13 14 15 16 17 18 19 20 21 22 23 24 25 26 27 28 29 30 31 ! Configuration File for keepalived global_defs { router_id LVS_DEVEL } vrrp_script check_apiserver { script "/etc/keepalived/check_apiserver.sh" interval 3 weight -2 fall 10 rise 2 } vrrp_instance VI_1 { state MASTER # 节点1设为MASTER,其他两台设为BACKUP interface ens33 # 网卡名称 virtual_router_id 51 priority 110 # 节点1最高设为110,其他两台可以设为105、100 advert_int 1 authentication { auth_type PASS auth_pass 1111 } virtual_ipaddress { 192.168.141.10 # 虚拟ip设置 } track_script { check_apiserver } }
/etc/keepalived/check_apiserver.sh 1 2 3 4 5 6 7 8 # !/bin/sh errorExit() { echo "*** $*" 1>&2 exit 1 } curl -sfk --max-time 2 https://localhost:16443/healthz -o /dev/null || errorExit "Error GET https://localhost:16443/healthz"
重启三个节点的keepalived服务,虚拟ip会落在k8s01节点上
安装k8s集群 准备镜像
1 2 3 4 5 # # # kubeadm config images pull --kubernetes-version=v1.28.2 --image-repository registry.aliyuncs.com/google_containers
包括下面的calico插件,所使用到的镜像列表如下:
配置模板
生成配置文件模板(也可以直接敲命令,但是模板更方便后面重置初始化):
1 kubeadm config print init-defaults > init.default.yaml
根据实际环境信息修改init.default.yaml文件内容:
init.default.yaml 1 2 3 4 5 6 7 8 9 10 11 12 13 14 15 16 17 18 19 20 21 22 23 24 25 26 27 28 29 30 31 32 33 34 35 36 37 38 apiVersion: kubeadm.k8s.io/v1beta3 bootstrapTokens: - groups: - system:bootstrappers:kubeadm:default-node-token token: abcdef.0123456789abcdef ttl: 24h0m0s usages: - signing - authentication kind: InitConfiguration localAPIEndpoint: advertiseAddress: 192.168 .141 .17 bindPort: 6443 nodeRegistration: criSocket: unix:///var/run/cri-dockerd.sock imagePullPolicy: IfNotPresent name: k8s01 taints: null --- apiServer: timeoutForControlPlane: 4m0s apiVersion: kubeadm.k8s.io/v1beta3 controlPlaneEndpoint: vip.cluster.local:16443 certificatesDir: /etc/kubernetes/pki clusterName: kubernetes controllerManager: {}dns: {}etcd: local: dataDir: /var/lib/etcd imageRepository: registry.cn-hangzhou.aliyuncs.com/google_containers kind: ClusterConfiguration kubernetesVersion: 1.28 .2 networking: dnsDomain: cluster.local podSubnet: 10.200 .0 .0 /16 serviceSubnet: 10.96 .0 .0 /12 scheduler: {}
初始化Kubernetes
只需要在第一台控制节点上初始化就行,其它节点加入后会自动扩散pod组件
1 sudo kubeadm init --config init.default.yaml --upload-certs
如果一切顺利,会得到下面的反馈:
1 2 3 4 5 6 7 8 9 10 11 12 13 14 15 16 17 18 19 20 21 22 23 24 25 26 27 28 29 30 Your Kubernetes control-plane has initialized successfully! To start using your cluster, you need to run the following as a regular user: mkdir -p $HOME/.kube sudo cp -i /etc/kubernetes/admin.conf $HOME/.kube/config sudo chown $(id -u):$(id -g) $HOME/.kube/config Alternatively, if you are the root user, you can run: export KUBECONFIG=/etc/kubernetes/admin.conf You should now deploy a pod network to the cluster. Run "kubectl apply -f [podnetwork].yaml" with one of the options listed at: https://kubernetes.io/docs/concepts/cluster-administration/addons/ You can now join any number of the control-plane node running the following command on each as root: kubeadm join vip.cluster.local:16443 --token abcdef.0123456789abcdef \ --discovery-token-ca-cert-hash sha256:562208147965e135a2b3ccead02c78a2be2925b4858103773d219468ba7ff6d7 \ --control-plane --certificate-key 33d03e7f28c79329c0c9fa4d919be264b658a0528224dbccd129b3c4b2686c1c Please note that the certificate-key gives access to cluster sensitive data, keep it secret! As a safeguard, uploaded-certs will be deleted in two hours; If necessary, you can use "kubeadm init phase upload-certs --upload-certs" to reload certs afterward. Then you can join any number of worker nodes by running the following on each as root: kubeadm join vip.cluster.local:16443 --token abcdef.0123456789abcdef \ --discovery-token-ca-cert-hash sha256:562208147965e135a2b3ccead02c78a2be2925b4858103773d219468ba7ff6d7
配置kubeconfig
这个会影响kubectl命令的执行(其它节点只要把文件拷贝过去就行)
1 2 3 mkdir -p $HOME/.kube sudo cp -i /etc/kubernetes/admin.conf $HOME/.kube/config sudo chown $(id -u):$(id -g) $HOME/.kube/config
安装网络插件 calico 如果未安装网络插件将会看到节点一直处于NotReady状态
可以下载一个部署文件:https://raw.githubusercontent.com/projectcalico/calico/v3.27.2/manifests/calico.yaml
确认pod网段与上面kubeadm init模板中的podSubnet一致,直接kubectrl apply -f部署就行
加入master节点 注意要指定一下cri-dockerd.sock
1 2 3 4 kubeadm join vip.cluster.local:16443 --token abcdef.0123456789abcdef \ --discovery-token-ca-cert-hash sha256:562208147965e135a2b3ccead02c78a2be2925b4858103773d219468ba7ff6d7 \ --control-plane --certificate-key 33d03e7f28c79329c0c9fa4d919be264b658a0528224dbccd129b3c4b2686c1c \ --cri-socket unix:///var/run/cri-dockerd.sock
如果一切顺利,将会看到笔记开头处的状态
FAQ 故障恢复 如果不幸遇到故障无法恢复,比如etcd存储报错导致apiserver失去一切响应,可以按下面操作进行重置,然后重新初始化环境
1 2 3 4 5 6 # !/bin/bash sudo kubeadm reset -f sudo rm -rf /etc/cni /etc/kubernetes /var/lib/etcd /var/lib/kubelet $HOME/.kube sudo ipvsadm --clear sudo iptables -F && sudo iptables -t nat -F && sudo iptables -t mangle -F && sudo iptables -X sudo systemctl restart cri-docker docker kubelet
参考:
https://blog.csdn.net/m0_37749659/article/details/130629326 https://www.redhat.com/zh-cn/topics/containers/what-is-kubernetes https://blog.midk9t.com/posts/k8s-on-ubuntu/ https://www.cnblogs.com/lldhsds/p/18261304 https://www.cnblogs.com/niuben/p/18872088